
3 Amazing Soap Science Fair Projects (for Middle & High Schoolers)
No, I’m not talking about soap operas! I’m talking about a much less melodramatic kind of soap: the one living in your bathroom.
Soaps, in general, have a bubbly character, they are fun to use, and most importantly they will keep things clean!
They have all kinds of properties and benefits for you or your household.
These experiments will help you understand soaps in general, their stain-removing effectiveness, and their pH levels.
1. Is Homemade Soap as Good as Store-Bought?

Age Range: 12+ | Middle School and Up
Most store-bought soaps contain a vast number of dangerous chemicals, from detergents to lathering agents as synthetic materials. Even though they are packed in pretty packaging, it’s all part of precise marketing and harmful chemistry.
Store-bought soaps contain chemicals like surfactants, parabens, pesticides, and formaldehyde, that penetrate the skin within a few uses. Many companies do not even list these chemicals as they don’t comply with FDA rules.
Conversely, homemade soaps do not contain dangerous chemicals (not unless you want them to!). They are healthier for the skin, rich with natural moisturizers and antioxidants. Last but not least,, they are cruelty-free and animal friendly.
When comparing both types of soap, it’s easy to say that homemade soaps are better. But let’s put this to the test!
⚠️ For your own safety, you will test soap’s cleaning abilities on different fabrics!
Supplies Needed
- Homemade soap;
- Store-bought soap;
- Red food dye;
- Yellow food dye;
- Blue food dye;
- Ink (or an ink pen);
- Cherry juice;
- Carrot juice;
- Apple juice;
- Sunflower oil;
- 1’ x 1’ Cotton cloth/ old bedsheets;
- 1’ x 1’ Polyester cloth.
- Plastic foil;
- Telephone or camera;
- Table;
- Water source.
This experiment should be conducted outside or in a bathroom to avoid staining items in your environment.
If you’re conducting this experiment inside, make sure to move away any electronic devices near you.
Procedure
- Prepare your environment, and remove any personal belongings that won’t be used in the experiment to avoid staining.
- Cut the cotton, and polyester cloths into 16 equal rectangles.
- Wrap your table with plastic foil, and place the materials for the experiment on the table.
- Prepare a place for drying, label one side with homemade, and another one store-bought.
Staining With Ink
- Take 2 cotton, and 2 polyester cloths and pour ink on them.
- Allow them to dry completely.
- In a sink, wash one cotton cloth with homemade soap, and another one with store-bought soap. Do the same with the polyester cloths.
- Make sure you know which cloths are washed with homemade soap and which are washed with store-bought soap. You can label them with a waterproof marker if needed.
- Place the cloths washed with homemade soap under the “Homemade” sign, and the cloths washed with store-bought under the “Store-bought” sign outside, and let them dry completely.
Staining With Food Dye
- Take 6 cloths.
- Dye 2 cotton cloths with red food dye, 2 cotton cloths with yellow food dye, and 2 cotton cloths with blue food dye. Repeat the step with polyester cloths.
- Separate the colored cloths into 2 piles, each pile should contain 1 cotton and 1 polyester cloth stained with red, yellow, and blue food dye.
- Wash one pile with homemade soap, and the other one with store-bought soap.
- Leave the cloths outside under the right sign, and allow them to dry thoroughly.
Staining With Fruit Juice
- Prepare 6 cotton cloths, and 6 polyester cloths.
- Pour cherry/ beetroot juice onto 2 cotton cloths, carrot juice onto 2 cotton cloths, and apple juice onto 2 cotton cloths. Repeat the procedure with polyester cloths.
- Place them outside and let them dry.
- Separate them into 2 piles, each containing cotton and polyester cloths stained with cherry/ beetroot juice, carrot juice, and apple juice.
- Wash one pile with homemade soap and the other one with store-bought soap.
- Place them outside in the right pile, and allow them to dry completely.
Staining With Sunflower Oil
- Prepare 2 cotton and 2 polyester cloths.
- Soak the cloths in oil for 3 minutes.
- Place them outside and allow the oil to dry completely.
- Part the cloths into 2 piles, each pile should contain 1 cotton cloth and 1 polyester cloth.
- Wash one pile with homemade soap and the other one with store-bought soap.
- Place them outside, near the right sign, and wait for them to dry completely.
Comparing Cloths
- After allowing every cloth to dry completely, separate them into 4 piles:
- Cotton cloths washed with homemade soap;
- Polyester cloths washed with homemade soap;
- Cotton cloths washed with store-bought soap;
- Polyester cloths are washed with store-bought soap.
- For easier comparison, label each cloth correctly, e.g. cotton cloth stained with carrot juice washed with homemade soap.
- Photograph every cloth, for future presentations.
- Rate each cloth. Use these factors for rating:
- Color
- Texture
- Smell
- Fabric. You can create your own exciting factors for a more creative rating!
- After rating each cloth, compare the end results from homemade and store-bought soaps (you can even compare the different textiles).
Ways to Modify This Experiment
You can substitute the cotton and polyester cloths with different types of fabric, you can use cotton twill fabric (also known as denim), linen, chiffon, or lace, OR simply said, use diverse fabrics made with natural or synthetic fibers. Each of these fabrics has different absorbent capabilities.
If you want to get better results and see the difference between homemade soap and store-bought soap, use more types of fabrics, and more types of soaps!
You can use dishwashing soap, antibacterial soap, plant-based soap, and exfoliating soaps!
You can use different colors of food dye. Instead of buying additional colors, you can use the red, yellow, and blue food dyes to create other colors. Just follow the color wheel and you’ll end up with many different options.
There are different types of ink you can use – printer ink, tattoo ink… Use your imagination! You can even make ink at home by boiling coffee and putting gum Arabic or honey until it thickens and becomes sludge.
As for teas, you can use black tea for a darker color, hibiscus tea for a reddish color, and green tea for a yellowish color.
Instead of using cherry juice, you can use beetroot juice. The same goes for carrot and apple juice. You can experiment with different juices, either homemade or store-bought!
Instead of using sunflower oil, you can use coconut oil, olive oil, or even animal fat. Each of these oils has different densities, which will be quite a challenge for washing out.
And last but not least, you can use different water temperatures to test the soap washing abilities.
Use your creativity to mold the experiment to your liking. If you want, you can use all of these modifications to get more precise results. Ultimately, this experiment can have many outcomes, depending on the factors implied.
Store-bought soaps contain more chemicals, which can act as stronger cleaning detergents, but they are more dangerous for the skin and the environment.
Homemade soaps have safer ingredients. It means they won’t harm you, your pets, or the environment.
2. Testing pH of Soaps
Age: 13-18 | High School
There are many ways you can test the pH levels of soap. Some may sound crazy, such as pressing your tongue on the soap. If the soap contains an excess amount of alkali, it will release electroshock to your tongue.
As a curious individual (maybe even too curious for my own good!), I have tested this on my own. I can assure you that the electroshocks aren’t that strong. But overall, it’s not a fun experience!
This test has been used for centuries, but it only implies that the saponification process is not complete. It doesn’t show the pH levels of soap, so no need to test it out.
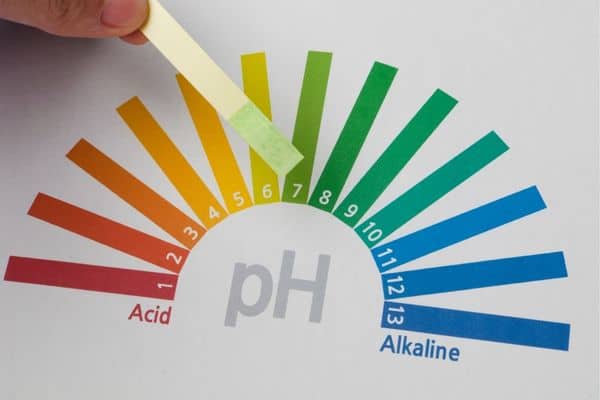
The best way you can test the pH levels of soap is with pH reagents like pH strips and pH drops.
Supplies Needed
- 0.5oz homemade soap shavings;
- 0.5oz store-bought soap shavings;
- Latex gloves;
- pH strips;
- 10oz distilled water;
- 2 glass bowls;
- 2 plastic spoons.
Procedure
- Prepare your surroundings, and remove everything that is not needed in the experiment.
- Clean the glass bowls and plastic spoons with hot water.
- Put on your gloves, and you can begin with the testing!
- In a glass bowl, pour 5oz of distilled water and mix in 0.5oz of homemade soap shavings.
- With a clean plastic spoon, mix the solution until the soap disperses into the water.
- Take 1 pH strip and dip it into the solution. Set it aside and prepare for the second test.
- Repeat steps 4, 5, and 6, but instead of using homemade soap, use store-bought soap.
- Wait for both pH strips to show the result. And you can compare the results!
💡 Want to take it a step further? Repeat the steps with different kinds of soaps, whether they are solid or liquid, shampoos and body washes, or even cleaning detergents.
Due to a large number of chemicals, the store-bought soap should have a pH level ranging from 9 to 12. If the results are higher than 12, that implies that the soap is a strong alkali, and it’s dangerous to use.
Alkaline soaps are very corrosive, so you should avoid using them on skin, hair, and pets. They can irritate your skin and they will cause a chemical burn, in the end, there’s no need of throwing them away because they have alternative uses like as cleaning detergents. To avoid the dangers you should always test store-bought soap.
Unlike store-bought soap, homemade soap is neutral and it should have a pH level ranging from 6 to 10. If the results are higher than 10, that indicates that the saponification process is not over.
If this happens, you should let the soap rest for a few days, and conduct the experiment one more time.
If the results are still higher than 10, they indicate that the recipe contains too much lye!
Ways to Modify This Experiment
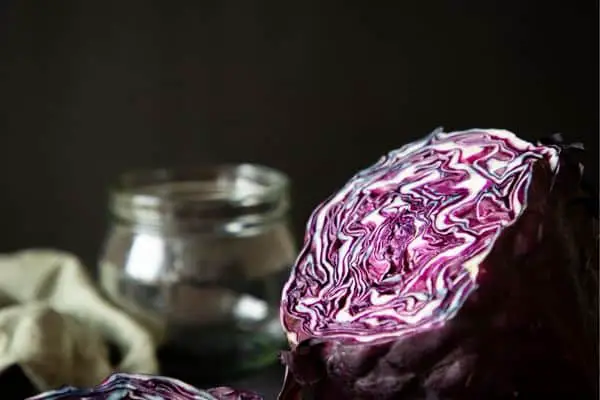
Instead of using pH strips, you can use red cabbage. Red cabbage contains a color-changing pigment called anthocyanin, and it changes its color depending on the pH levels of the solution.
- Shred red cabbage into small pieces.
- Soak it in distilled water for an hour. The ratio should be 2 parts cabbage, and 1 part distilled water.
- With a pipette, take out 0.4oz and pour it onto the soap.
- With a clean hand, rub in the cabbage liquid until the soap forms a foam.
- Wait for a few minutes until the foam changes color.
Based on the color you should be able to determine the pH level of the soap.
If the soap is acidic (below 7) the foam should have a color ranging from red to pink to magenta. If the soap is neutral (pH level of 7) the foam should be light purple. Finally, if the soap is alkaline, it should have a color ranging from dark purple to blue to green to yellow.
Another modification you can incorporate with the experiment is to do pH testings every 2 hours while making the soap, to observe the whole saponification process. The saponification process lasts from 24 hours to multiple weeks depending on the ingredients used for making the soap.
Each test strip should have a different color, starting from dark blue, and ending up with green.
Furthermore, you can test the pH levels of plant-based soap, or plants rich in saponins.
- Start by preparing a 1:1 mixture of distilled water and plant leaves.
- In a pot, pour the mixture, turn the stove on medium heat, and bring the mixture to a roiling boil.
- Allow the mixture to boil until it becomes syrupy liquid.
- Let it cool down for a bit, and dip a pH testing strip into the mixture.
The pH levels of plants rich in saponins are quite the opposite of regular soap. Their pH level ranges from 4 to 7, and they are considered acidic. Therefore these plants have stronger antibacterial properties.
This experiment is great for learning about pH levels and putting them into practice. It allows you to scrutinize the dangers of alkaline soaps, natural pH testers, and saponification.
3. Testing Antibacterial Properties of Homemade Soap
Age: 13-18 | High School
Overall, antibacterial soaps are designed for killing viable organisms present on all kinds of surfaces. They contain chemicals like triclosan, triclocarban, chloroxylenol, and many more. These chemicals act as disinfectants, and they act rapidly.
The use of antibacterial soaps can help you get rid of living bacteria and viruses that have a bigger percentage of lipids in their structure. However, they do not affect fungi, different kinds of endospores, and viruses that don’t contain lipids in their structure.
This topic has sparked some interest in scientists, and they have debunked the term “antibacterial soaps.”
The thing is, EVERY soap has antibacterial properties, so the label antibacterial is redundant.
When comparing store-bought “antibacterial” soap with homemade soap, the store-bought soap is more likely to irritate your skin. On the other hand, the homemade soap will be more simple and it will be harmless if made correctly.
But, in the end, both types of soap should give similar results.
💡 This experiment should be conducted over a longer period, and it should be tailored to your schedule!
Supplies Needed
- Homemade soap;
- Store-bought antibacterial soap;
- 8 Petri dishes with an agar base;
- Microscope.
Procedure
Part 1: Spending Time Outside + Homemade Soap
- Prepare 2 Petri dishes before starting your day, and label them correctly, for example, Activity + Soap.
- Continue with your day, and try to avoid washing your hands. ⚠️To avoid bacterial infections, you must avoid touching your face with your hands!
- After spending your day, take 1 Petri dish and press your fingers onto it.
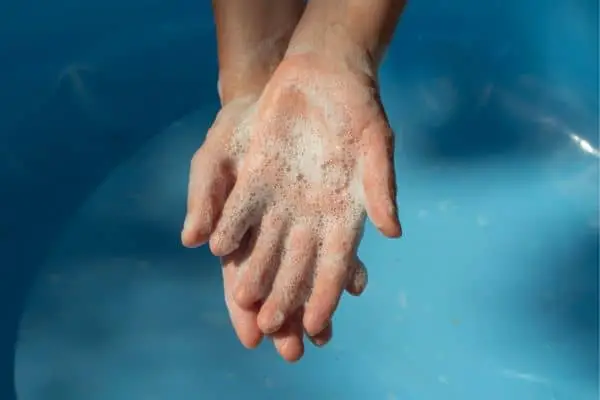
- Go and wash your hands with homemade soap for 30 seconds or more!
- After washing your hands, prepare the second Petri dish, and once again, press your fingers onto the Petri dish.
- Store both of the Petri dishes in a cold place for 2 days, and wait for the bacteria to cultivate. If you want to speed up the process, you can store them in a room with a higher temperature.
Part 2: Spending Time Outside + Store-Bought Antibacterial Soap
Repeat the first part from the beginning to the end. But instead of washing your hands with homemade soap, wash them with store-bought soap!
After this part, you should have 4 Petri dishes stored in a cold place!
Part 3: Working on a Laptop/ Using a Telephone + Homemade Soap
To get the best results, this part of the experiment should be done on a busy workday!
- Early in the morning, with clean hands, prepare 2 Petri dishes, and label them correctly.
- Continue with your work. ⚠️To avoid excessive screen time, don’t use your laptop or phone unnecessarily just for the experiment!
- After finishing your work, take one Petri dish and press your fingers firmly onto it.
- Wash your hands with homemade soap for 30 seconds or more!
- Take the other Petri dish and, once again, press your fingers on it.
- Store the Petri dishes in a cold place for 2 days. Or until something interesting happens!
Last Part: Working on a Laptop/ Using a Telephone + Store-Bought Antibacterial Soap
On a new day, repeat the third part of this experiment, but instead of using homemade soap for cleaning your hands, use store-bought antibacterial soap.
At the end of the experiment, you should have 8 labeled Petri dishes ready to be examined!
Examination

- Assemble the microscope, read the regulations, and set the magnification regarding the guidelines.
- Prepare the Petri dishes for examination.
- Take a closer look at the bacterial cultures present on the Petri dishes that were used before washing your hands.
- Compare the before and after results of washing your hands.
- Compare the Petri dishes that were used after washing your hands with homemade, and store-bought soap. In the meantime count the number of bacterial cultures in the Petri dishes and write them down.
- You should be able to see the difference between the effects of homemade, and store-bought soap.
You can photograph the Petri dishes, and use the photographs in presentations and when comparing the soaps next to each other.
Additional Steps
You can extend the experiment by adding more tests after doing different kinds of everyday activities.
Some recommended examples include: after handling pets, after going swimming, after gardening, and even after a night out!
Ways to Modify This Experiment
First and foremost, instead of pressing your hands on the Petri dish, you can use a clean cotton swab to collect the bacteria present on your hands.
You can try out different types of soap, starting from a normal bar of soap, store-bought or homemade, to different kinds of liquid soap, hand disinfectants, and even medicinal soap.
The results should show that a homemade bar of soap is more or less equally effective as store-bought soaps, whether they are solid or liquid, and normal or antibacterial!
If you’re making the soap just for this experiment, you can use essential oils like lemongrass essential oil, eucalyptus essential oil, orange essential oil, and tea tree oil. These essential oils have antibacterial, antiviral, and antifungal properties that are effective against more than 25 types of bacteria, viruses, and fungi.
When the right essential oils are combined, they will get rid of viable materials, without harming your skin.
To sum things up, all soaps have antibacterial properties. But some specific soaps contain harmful chemicals which can damage your skin, and are toxic if used on children and pets.
Frequently Asked Questions
What types of soaps are safe to use on pets?
Most natural soaps are safe to use on pets, they keep their natural oils on their fur and they don’t harm the pet in any way.
Store-bought soaps that don’t contain parabens, paraffin, sulfates, and perfume are also safe to use on pets.
Which soaps are the most effective antibacterials?
All soaps have antibacterial properties, but some soaps have proven more effective than others!
Store-bought antibacterial soaps rely on chemicals like triclosan, triclocarban, and chloroxylenol, to kill living bacteria, and lipid-containing viruses. These soaps aren’t effective on bacterial endospores, viruses containing no lipids, and fungi.
Unlike antibacterial soaps, regular bars of soap containing lemongrass essential oil, eucalyptus essential oil, orange essential oil, tea tree oil, and many more, have proven to be more effective in eliminating microorganisms living on all types of surfaces!
Soap bars containing essential oils have antibacterial, antiviral, and antifungal properties, thus they are able to eliminate more types of viable microorganisms!


