The Science of Soap Making: Learn About Chemistry of Bubbles (+ Saponification)
Soap is not just about personal care. Or washing your hands for 20 seconds. (Remember that?)
Soap is also and primarily about chemistry, and LOTS of it.
This article will help you understand the science (some would even say art!) behind soap. Read on to learn what happens to lye and fat when they are mixed together, and the chemistry behind different types of oil, sodium, potassium hydroxide, and altogether saponification.
And if you’re curious about making soap at home, check out my other article on 3 amazing ways to DIY your own soap!
Or another one on science fair projects around soap.
First Things First: The Science of Saponification

In simplest terms, saponification is the process of hydrolyzing fats (esters). It derives from the Latin word ‘sapo’ which means, well, ‘soap.’ So saponification is the process of making soap, that is mixing sodium or potassium salts with fatty acids.
In chemistry terms, saponification occurs when triglycerides (ester groups) react with water and bases like sodium hydroxide(NaOH) or potassium hydroxide (KOH). The reaction produces glycerol (alcohol) and potassium or sodium fatty acid salts.
Here is the fundamental chemical reaction:
Ester + Base (Sodium/ Potassium Hydroxide) → Alcohol + Soap
The ester reacts with water and the bases, which form carboxylate ions and alcohol, and in turn, the carboxylate ion is converted to carboxylic acid.
Under the Hood: Chemical Reaction of Saponification
The precise chemical reaction can be presented as:
Triglycerides + Sodium/Potassium Hydroxide → Glycerol + Soap

The saponification chemical reaction from above can be separated into 4 important steps:
Step 1: The First Dance of Atoms
After the ester gets mixed with a NaOH + a water solution, the process of saponification starts. The carbon present in the ester gets attacked by the negatively charged OH (alkoxide) base. In the meantime, the sodium atom doesn’t bond with anything until there is a single bonded, negatively charged oxygen atom!
Furthermore, the double bond, connecting the oxygen and carbon atoms, breaks down into a singular bond because of the OH anion. And the OH base bonds with the carbon atom. The end result is an orthoester!
This process is called a nucleophilic addition!
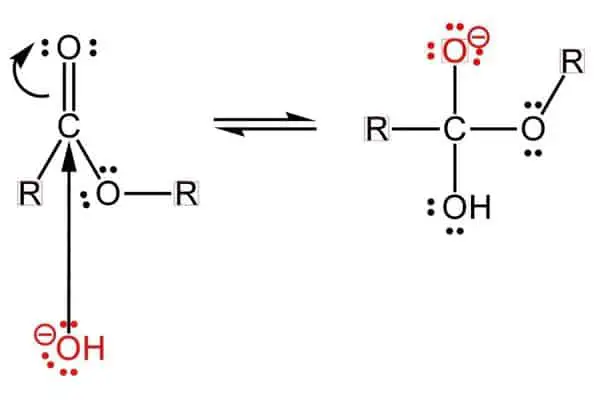
Step 2: A Single Bond’s Not Enough
Then, the oxygen electron present in this tetrahedral orthoester ends up being too unstable for this formation.So the carbon atom reacts immediately by transforming the single bond, connecting it with oxygen into a stronger, double bond.
The carbon atom is a 4-valent atom, which means that the atom is able to form 4 bonds, whether they are single, double, or triple!
The formation of the double bond leaves the carbon atom with 5 bonds and an anion. The double bond impels the anion and connects it with the OR group, which leaves the carbon bond and it floats around the carboxylic acid.
The end result is a carboxylic acid with a negatively charged OR group floating around!
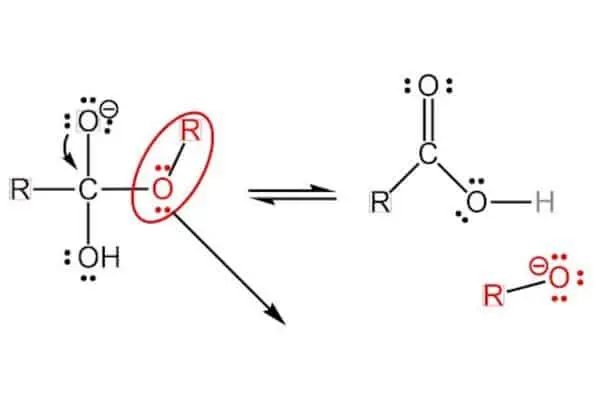
Step 3: Too Acidic? Neutralize!
The negatively charged OR group is going to bond with the proton of the hydrogen atom in the carboxylic acid. Just like other acids, the carboxylic acid is willing to give up the hydrogen atom because of its strong acidic properties. Meanwhile, the ion and anion will neutralize each other.
The oxygen atom, which was connected to the hydrogen atom, will become a single bonded anion. This oxygen anion will be crucial in the final step where the sodium ion will get near the carboxylate anion.
The end result of this step is non-polar alcohol and a carboxylate anion.
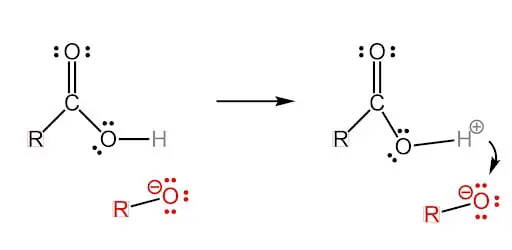
Final Step: Alcohol as a Byproduct
The sodium ion gets near the oxygen anion, floats freely around it, and creates the carboxylate head. The sodium atom and oxygen atom never connect and that leaves the carboxylate head negatively charged!
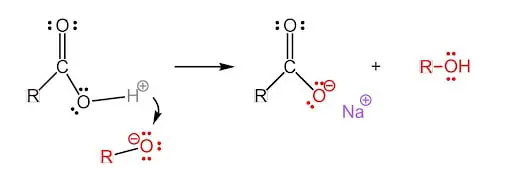
Finally, the completed saponification process produces soap and alcohol!
This step-by-step procedure presents the complicated chemical formation of soap, and breaks it down into smaller, bite-sized reactions that can be easily understood!

Soap Structure: Where Do the Bubbles Come From?
Soaps have been used for centuries, but few people know how soap works. The chemical structure of soap has long chains of hydrocarbons with a carboxylate head.
The carboxylate head has sodium/potassium ions floating freely around it, which leaves it negatively charged. The head is hydrophilic and it sticks to water molecules.
Contrasting with the head, the hydrocarbon tail is non-polar and hydrophobic which means that it will attach itself to oils and grease thus being oil soluble.
After getting in contact with water, the different parts of the soap molecule will start reacting differently and they will get separated, so to say. At last, after the soap gets in contact with water, the tail will stick to oil and the head will stick to the water molecules resulting in a separation.
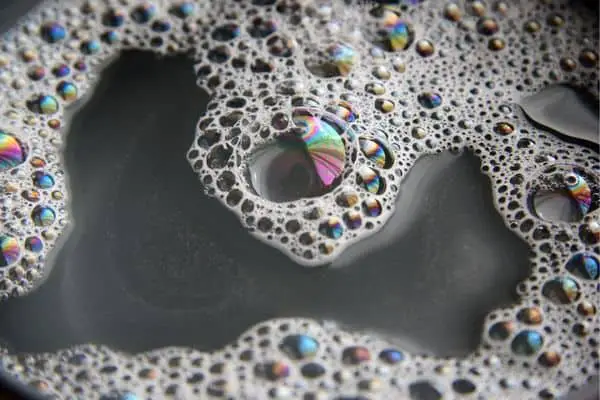
Bubbles and foam form because of the separation I mentioned above. The stronger the separation, the bigger the bubbles!
Saponification Value
Saponification value/saponification number is the weight of sodium hydroxide/ potassium hydroxide needed to saponify one gram of fat/oils.
The number depends on the molecular weight (the molecular weight corresponds to the chain length of the oil/fat).
The ratio of the saponification number to the chain length/molecular weight is inversely proportional. So if an oil/fat has a short chain/ small molecular weight the saponification value will be higher.
There are many ways you can calculate the saponification value on your own. However, it’s a complicated process because most of the equations require multiple chemical titrations with hydrochloric acid and many precise measurements of the oils or their molecular weight.
In the end, you can always use a saponification calculator to see how much sodium/ potassium hydroxide you need to use while making the soap.
Many oils have different saponification values, so you should be precise when entering the information in the calculator.
Many oils contain non-volatile components that cannot be saponified, and their percentage can vary from oil to oil. The acceptable amount of unsaponifiable components is up to 3% of the weight of the oil. Anything above 3% will create a defective soap that won’t react properly with water, and won’t be effective for cleaning.
But What About Alcohol?
During saponification, the reactants produce a small amount of alcohol that evaporates when the process is over. Alcohol can cause skin irritations if the soap is used before the saponification process is over. So the best thing to do to avoid getting alcohol on your skin is to wait until the soap fully hardens and oxidizes.
Naturally, soaps are soluble in alcohol. So many individuals use ethanol or isopropyl alcohol to prevent ash on soaps and to achieve a smoother soap.
Many other reasons why people deliberately opt for alcohol is to layer different kinds of soap to get a colorful design. Spraying a new batch of soap with alcohol creates a sticky texture that acts like glue for another layer of soap while preventing bubbles. Furthermore, the alcohol evaporates and it doesn’t affect the alcohol levels of saponification.
Overall, if the procedure is followed correctly, the produced or applied, there shouldn’t be any alcohol at all.
Uses of Soap
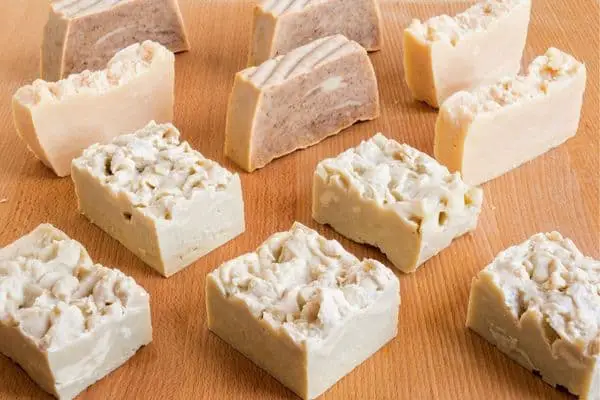
Soap has a significant number of uses in the household.
We all know that soap can be used as a cleaning agent. It removes germs and bacteria effectively. It removes dirt from all kinds of surfaces and it leaves things feeling clean.
Unbeknownst to many, soap can also be used as a fire extinguisher. The thing is, all the bubbles will help with insulating the surfaces quickly, and it requires less water.
Soap has many other alternative uses all around. Soaps with a large percentage of fats can act as lubricants for door hinges and thus it will help get rid of loud and annoying door squeaks.
Give your mirrors a go over with some soap and it may just prevent them from steaming!
Plus, the smell of soap can act as a bug repellent when placed in the closet, and many more.
Frequently Asked Questions
How long does saponification last?
The saponification process lasts until the water evaporates from the soap.
In cold-processed soaps, the saponification process can last from 4 to 6 weeks, while in hot-processed soaps it lasts until the soap solidifies, usually from 24 hours to 48 hours after the soap was made.
The use of external heat can speed up the saponification process because the water evaporates faster.
Which plants are rich in saponins?
Plants like soapberries, soapwort, yucca, clematis, ginseng, licorice, buffaloberry, and plants that can grow bigger flowers are rich in saponins and can be used as an alternative to a bar of soap.
The best way to use them as soap is to boil them and make liquid soap, or just dampen them and rub them on your hands until they form a soft foam.

