9 Amazing DIY STEM Activities for Kids Using Upcycled Materials
The explosion in innovation in the technology sector during the 21st century has seen demand for skilled workers in STEM fields sky rocket. Conversely, statistics show there is also a shortage of labor in these fields – especially when it comes to women.
As a result, there is a growing pressure on both educators and parents to ensure STEM learning is being incorporated into the curriculum. However, a lot of kits designed to develop skills like engineering, robotics and science inherently tend to be quite expensive. But that doesn’t have to be the case!
There are tons of great DIY STEM activities that teachers and parents can carry out at home. Most of which utilize waste or recycled materials, so are basically free! The only investment is your time and creativity. Below we summarise some of our favorite STEM activities for kids for developing engineering, design and creativity skills.
DIY STEM Activities for Kids
Popsicle Stick Catapult
- Materials — Popsicle sticks, rubber bands, bottle caps, ammo
- Difficulty — Easy
- Extensions — Change design to extend the shooting distance, test different objects, measure distances
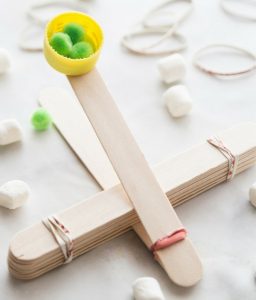
This is a great budget STEM activity for developing engineering skills and learning basic scientific processes and principles. The best part is the build is super easy and only involves a few materials that can be collected from household waste or bought cheaply from a craft store!
What we love about this activity is how many ways there are to extend or enhance the learning experience. After kids have built the initial catapult, get them to modify the design to see if they can get the projectile to fly further e.g. extend the throwing arm or move the stack to increase the leverage. This is great for learning about physics concepts like leverage and energy.
It’s also great for developing science skills. Get kids to formulate a hypothesis, test it through experimentation, record and measure their results, then try to explain them. For example, which material will fly the farthest and why? For the older kids, get them to record the distance and time the projectile is in the air. They can then use the speed = distance/time equation to calculate the speed!
Build instructions
Rubber Band Fan Powered Car
- Materials — Plastic bottles, rubber bands, skewer sticks, glue
- Difficulty — Moderate
- Extensions — Modify for speed or distance
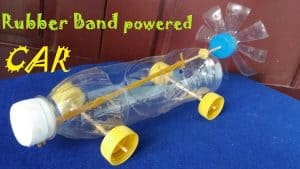
This cool little car moves entirely through a rubber band powered fan mounted to the back. It’s a little more challenging than some of the other activities here, but super rewarding for kids when they see their creations zooming along the ground!
Through the rubber band mechanism, kids can learn how potential energy is stored and then converted into movement. The initial build will also teach engineering skills, which can be developed further by getting creative and adding modifications to the car. For example, kids can experiment with different wheel sizes and fan shapes.
Get them to draw up a hypothesis about how changing the design will affect the speed and distance the car can travel. Then they can record their results and similar to the catapult, use the distance/time equation to work out the speed.
Build instructions
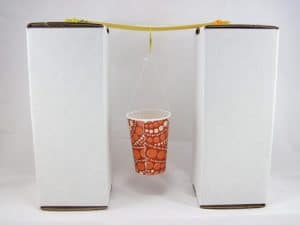
Mousetrap Car
- Materials — Mousetrap, wheels e.g. CDs/DVDs/card, axles e.g. pens/dowel, card for body, tape, string, eye hooks, glue
- Difficulty — Hard
- Extensions — Modify for distance
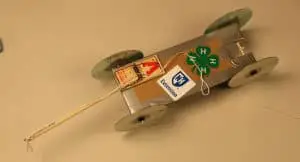
This classic DIY STEM activity for kids is one of the most difficult we have featured here, but also has some quite advanced options for higher learning. The initial build involves using the energy stored in the spring mechanism of a mouse trap to turn wheels on a car. There are lots of guides with different designs, check out a couple below.
Similar to the plastic bottle car, once built kids can then work on modifying the basic design to increase the distance the car can travel. They can reduce the weight by removing unnecessary materials or thinning them out by drilling holes. Friction can be reduced where ever there are moving parts e.g. use a smoother axel material, use straws cut in half to hold the axle and making sure the spring is well lubricated.
There are also lots of ways to increase the travel distance by modifying the wheels. Thinner, more rigid wheels will reduce friction against the surface it is travelling on, whilst larger rear wheels helps to reduce the time taken for the spring to release its energy. Using rubber bands or balloons to coat the edge of the wheels will improve traction and ensure energy isn’t wasted. Find out more about mousetrap car physics here.
Build instructions one, two and three
Make Slime
- Materials — Washable PVA glue, activator, food coloring, glitter etc
- Difficulty — Easy
- Extensions — Make it magnetic or glowing
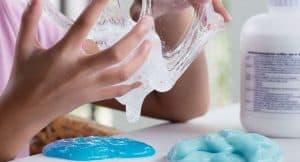
Making slime is a hands-on way for kids to learn some chemistry through mixing together simple ingredients to produce a new compound, the slime! There are tons of different recipes available online, but the key ingredient is washable PVA glue – sometimes called school glue.
The other key ingredient is an activator chemical containing borate ions, such as liquid starch, saline solution or Borax (usually available in a grocery store). The PVA glue is made up of lots of free moving polymer molecules that give it liquid properties, but when the borate ions are added they connect the polymers together in a process known as cross-linking. The resulting compound is more viscous and slime-like!
The final element involves adding something like food coloring or glitter to give the slime a funky appearance. For an extension add iron oxide to make it magnetic! You could also use glow in the dark PVA.
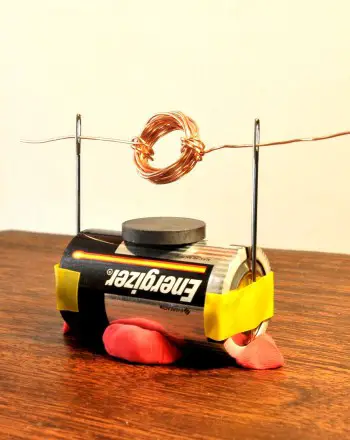
Build a Simple Electric Motor
- Materials — D battery, insulated 22G wire, sewing needles, modelling clay/blu tac, electrical tape, circular magnet
- Difficulty — Moderate

This relatively simple science experiment involves building a small electric motor using only a few key materials. Due to electromagnetic interactions created by the closed circuit system, if you spin the wire coil – or motor – it will continue to spin in that same direction. However, try the opposite direction and it will not spin!
Through this simple and safe build kids can see physics in action as electrical energy is converted into mechanical energy, or useful work. This activity is great for learning how currents flow through a circuit, plus how electromagnetism works. Check out the instructions below for a lesson plan and detailed explanation of the science!
Build Instructions
How Strong is Spaghetti?
- Materials – Spaghetti, optional extras: styrofoam, blocks, lego, rubber bands, hooks, string
- Difficulty – Easy
- Extension – Spaghetti bridge engineering experiment
The spaghetti strength experiment is another super cheap DIY STEM activity that can be used to teach a surprising range of subjects, including engineering and physics. Additionally, the basic ideas of the activity can be extended and adapted to whatever learning level the kids taking part are.
The starting point is to demonstrate the strength of one piece of spaghetti through showing how much force is required to snap it. For example, insert one end into a piece of styrofoam and apply pressure from the top or place it across two wooden blocks and measure how much mass it can support before snapping.
Next, you can get kids to test how the mass it can hold changes when more spaghetti is used. They can also make a prediction and test it. For example, how many strands inserted upright into styrofoam will it take to hold a textbook? Another test is to make a bridge between two blocks, then predict and measure how much mass different quantities or configurations can hold. Does it make any difference if they are laid flat or bunched together with tape?
Through making predictions and testing them, kids can develop an understanding of science processes whilst also learning about the physical properties of materials. There is also an excellent bridge building extension activity where kids can learn some of the basic engineering that goes into bridge building, including tension and compression. Find out more in this article by the Scientific American.
Plastic Bottle Paddle Boat
- Materials — Flat edged plastic bottle, plastic milk bottle, two wooden chopsticks or equivalent, rubber band, waterproof tape
- Difficulty — Easy
- Extensions — Change boat shape/material or size of paddle
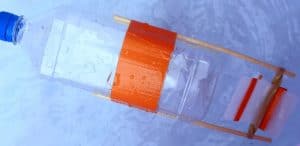
This budget DIY STEM activity is a quick and easy way for kids to build their own paddle boat out of waste materials. The paddle is powered by a rubber band mechanism which, similar to the rubber band car, shows how potential energy can be stored and released as mechanical energy. Kids can also learn some basic design engineering skills with the build.
There are a couple of ways to extend this activity, both involving modifying the boat in some way and measuring the outcome. The first is to change the paddle mechanism in some way, such as change the material, size or increase the tension in the rubber band, and the second is to change the boat shape or material. How do these modifications affect the distance or speed the boat can travel at? Get kids to predict and test the outcomes.
Build Instructions
Stick Rafts
- Materials — Sticks, string, optional extras: sail material
- Difficulty — Easy to moderate
- Extensions — Modify for speed, max cargo etc
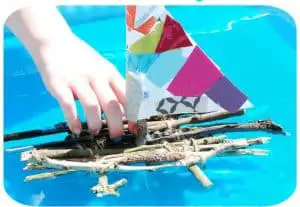
These stick rafts are one of our favorite STEM activities for kids, purely because it can be carried out almost entirely with materials gathered outdoors! Firstly, they can plan their boat design, thinking about the shape and how they will construct it. Next they can go out and gather the materials and build their boat. They may find at this stage their initial design needs altering – great for learning trial and error.
Once built, kids can take their boats out and test them in the water. Get them to assess how their boat has performed and what improvements could be made. For an extension, they could try adding a sail to increase the speed the boat can move at. Another option could be to experiment with raft designs and find what the best is for holding cargo.
Build instructions
Pencil Crossbow
- Materials — pencils, rubber bands, pins, binder clip
- Difficulty — Easy
- Extension — Make a target
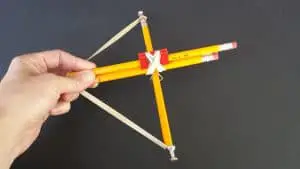
A very easy STEM activity that is quick to build and a lot of fun! With just 4 pencils, 2 rubber bands, a binder clip and 2 pins — all things you can find lying around the house, kids can build their very own working crossbow. They can also build a target as a little extension.
Build instructions
Summary
These ideas are great, but it can be difficult to find DIY STEM activities that do develop computing or electronics skills. For some great ideas to develop these elements, see our article on coding toys for kids and teens.


