How to Make Essential Oils at Home — 3 Different Methods (Great STEM Activity!)
(Featured image credit: foam from Elgaland Vargaland, CC BY-SA 2.0 https://creativecommons.org/licenses/by-sa/2.0, via Wikimedia Commons)
It’s not just about rolling up your sleeves and getting messy.
DIY-ing your own essential oils is also about learning more about the biology and chemistry of plants, as well as different oil extraction methods. And, of course, having lots of fun!
These recipes are fit for everybody, from middle schoolers up to adults who want to use homemade ingredients in their baking.
(They’ll also be a nice supplemental activity for students thinking about how to use essential oils for their next science fair project.)
In this article, you will be able to see essential oils from a scientific perspective to a chef’s perspective. Moreover, you will be able to find out more about types of oil extractions, which plants are safe, and which essential oils can be used for cooking!
3 Easy Ways to Extract Essential Oils at Home
Most essential oils are highly concentrated and volatile aromatic compounds that need to be extracted from plants.
But not all plants are good plants. First, you need to know which ones you can actually use.
Overall, the scent glands in plants are located in the flower or other floral parts of the plants, but every plant has a different structure and different use. For essential oil extractions, we can use every part of the plants. In other words, flower petals AND buds AND leaves.
There are many techniques to properly extract essential oils such as:
- Steam distillation
- Solvent extraction
- CO2 extraction
- Maceration
- Enfleurage
- Cold press extraction
- and water distillation
In the following experiments, you will get to try 3 of the most efficient techniques used for extracting essential oils.
#1 Essential Oils from Steam Distillation
Age range: 13-18 | High School
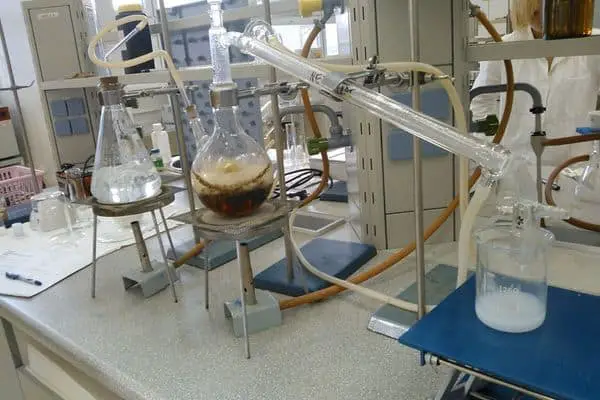
Steam distillation is definitely one of the most straightforward and common ways to extract natural essential oils from a plant. It’s a procedure of steam vaporization in which the steam turns the plants’ volatile compounds and condenses them from stainless steel.
You’ll basically use an inlet in which you’ll inject steam into the plant material. This allows the plant to release its aromatic molecules into vapor.
These compounds are then extracted into a container called a ‘condenser’ that has two pipes. The cold water enters the container through the first pipe, and the hot water exits it through the second.
What you’ll get is perfect circulation, using a very simplified contraption that basically works as in the image below:
MAKY.OREL, CC BY-SA 3.0 https://creativecommons.org/licenses/by-sa/3.0, via Wikimedia Commons
This container allows the already condensed vapor to cool back into a liquid with acceptable temperatures.
You’ll get a very concentrated liquid by-product that needs to be collected from the residual material via a separator.
Since oil doesn’t mix with water, your end-product liquid will come up on top of the water. So all you need to do is siphon it off! Plus, essential oil from clove is heavier than water, so you can find the finished liquid at the bottom.
Safety Gear
- Lab coat
- Safety glasses
- Latex or nitrile gloves
- Insulated gloves for handling hot materials
Supplies & Materials
- Dried plants – biomass
- Water
- Electric heater
- Chassis
- Iron frame
- Flask holder
- Cross clip
- Iron rings
- Two necked flask
- Distillation flask
- Distillation elbow
- Serpentine condenser
- Separating funnel
+ Items for Disposing of and Cleaning the Lab Equipment
- Flask
- Brush
- Non-reactive cleaners
Step-by-Step Procedure:
- Before starting the experiment, you need to gather plants and allow them to dry completely. If you’re not able to gather plants, you can always find dried plants/herbs in pharmacies, organic shops, or even online!
- Set up your equipment properly and check if everything is screwed in perfectly.
- Fill the two-necked flask with water, the distillation flask with the dried plants, and the condenser with cold water.
- Turn on the electric heater. And check the temperature of the two-necked flask regularly, and keep it between 140 – 212 degrees F. After some time, the steam will hit the biomass and it will help release the volatile compounds from the biomass into the steam. When the steam passes through the condenser, it will decrease its temperature. This helps it transform its state of matter from steam to liquid. Furthermore, the liquid in the separator will have an extract of essential oils and a solvent called hydrosol.
- Allow the heterogeneous solution to rest, because of its density, the oil will separate from the hydrosol.
- Carefully release the hydrosol and you will be left with the purest form of essential oil.
#2 Essential Oil Maceration
Age Range: 13+ | Middle School & Up
Essential oil maceration is an extractive method of soaking plant parts in liquids like water, oil, and alcohol in an air-tight container. This allows the plants to disperse their scent into the solvents.
You can use different kinds of flowers or herbs, like roses, chamomile flowers, lavender – almost any plant that you can find in your garden.
The procedure in itself is quite simple. Not nearly as many items and supplies as with the previous method!
But one of the most important parts is checking your essential oil by “burping” the mason jar (opening it to release pressure). Just like you burp your pickles!
This low-effort technique allows you to make a good quantity of exceptionally smelling essential oils even if you have a tight schedule.
Supplies & Materials
- Mason jar with a lid
- 1 cup of flower petals
- 1 cup of grapeseed/ jojoba or olive oil
- A pot of water
- Cooking stove
Step-by-Step Procedure:
- Put the flower petals in the mason jar, and pour oil on them until they are soaked.
- Prepare a pot with cold water.
- Place the mason jar into the pot of water.
- Turn on the stove on medium heat and allow the water to get a rolling boil.
- Let the water boil for 20 minutes and turn off the stove.
- Allow the mason jar to sit in the pot until the water is completely cooled.
- Take out the mason jar and let it sit for 24 hours at room temperature. For stronger results, keep the mason jar closed for a longer period of time.
- After the resting period, open the mason jar and use the oil however you please.
If you want to make your oil stronger, you should set it aside for 2-4 weeks. Just make sure to check, it every week and shake the mason jar to mix any residuals.
But what about your flower petals? By all means, leave them in the mason jar!
But if they are not completely boiled, they may grow mold. To avoid mold, allow the water with the mason jar to boil for a longer period of time at a lower temperature!
My personal recommendation is to use grapeseed oil. It’s very lightweight and has a neutral scent that doesn’t interfere with the smell of the flowers. Plus, it doesn’t leave a greasy residue when used on the skin.
This oil can be used in various instances. For example, you can pair it with stress-relieving plants like lavender or chamomile and use it as a massage oil. Or you can put it in homemade creams, candles, even homemade soap!
Overall, you can use any type of plant but make sure they are safe to use on your skin!
If you want to create a perfume tincture, use perfume alcohol instead of oil. The process is the same, but the waiting period is longer. It usually takes up to 3 months to create a strong perfume tincture.
#3 Making Vanilla Extract at Home
Age Range: 21+ | Adults
Many chefs make their own extracts by preparing an alcohol tincture with the desired plant. Making an extract takes longer, but the end result will be quite satisfying!
And before you ask if food extracts are essential oils, the answer is yes — and no. Cooking extracts are just essential oils dissolved in alcohol, but they don’t have the same uses as other essential oils!
Similar to an oil maceration, you need to soak natural, edible ingredients in a stronger type of alcohol, and set your concoction aside for 8 weeks minimum.
This recipe gives you the know-how on making a vanilla extract tincture at home. This tincture should be used only for cooking recipes since it’s made with strong liquor. The liquor used should be 80 proof or stronger.
Supplies & Materials
- 1/2oz of vanilla beans;
- 1 cup of Vodka;
- Mason jar/ Glass bottle.
Step-by-Step Procedure
- Make a cut on the vanilla beans. It should look like a slit that will uncover the vanilla seeds.
- With a dull knife, scrape off the beans and put them in a mason jar.
- Add the vanilla bean “shells” into the mason jar.
- Pour a cup of vodka into the mason jar, and stir with a spoon until the seeds are floating around.
- Put the mason jar into a kitchen cupboard at room temperature, and without sunlight.
- Shake every week!
The mason jar should stay unopened for 8 weeks minimum. But if you want a stronger taste, you can leave it to brew for more than 6 months!
Mixing vanilla beans with vodka will give you a cleaner vanilla taste. However, you can replace the vodka with gin, whiskey, scotch, or rum for a deeper, smoky taste.
You can try making this extract with cinnamon, mint leaves, all kinds of citruses, cocoa beans, and even seeds like almonds, walnuts, and many more. The options are endless!
Feel free to also mix different kinds of seeds. If you want a chocolaty flavor, you can try mixing cocoa and vanilla beans in whiskey. On the other hand, if you want a refreshing mojito flavor, try mixing mint leaves, lime, and white rum. You can tweak and experiment to your heart’s content!
Overall, the recipe is simple, and you don’t have to use precise measurements. If you want a more dominant taste, you can add less alcohol and more ingredients. Whatever you choose, be sure to always follow one rule: the ingredients should be COMPLETELY covered in alcohol.
If you’re planning on making a stronger extract, you can get a smaller jar. Just squish in the ingredients and add alcohol until it’s full to the brim!
After the extracts are ready, you can use them for your everyday cooking. They’ll spice up all kinds of cookies and cakes, coffees, cocktails, and even teas!
Bottom line, essential oils can be brewed at home with professional equipment or a simple mason jar. Whichever method you choose, you’ll make your skin happy. And unlike with store-bought essential oils containing a bunch of unknown chemicals, you can make perfectly safe essential oils with very few ingredients!
Frequently Asked Questions

Which essential oils are edible?
Essential oils that are specifically prepared for cooking are edible!
Many essential oils are made from edible ingredients, but that doesn’t always make them edible. Typical essential oils made with oil maceration can be edible if the plants are non-toxic, edible, completely clean, and if the oil is safe for ingestion.
Other types of edible essential oils are cooking extracts. They are made with strong alcohol that gets rid of any bacteria, and it preserves the taste of the plants used.
Can essential oils go bad?
The short answer is yes. Essential oils can go bad whether they are homemade or store-bought!
They can cultivate bacteria if they are left out in the open. Moreover, they can develop molds or even larvae!
There are many signs that essential oil has gone bad:
- Discoloration: if its initial color has darkened since it’s been opened.
- Foul smell: but even if it merely smell bland, it can be a sign to steer clear!
- Texture: Many oils will thicken if they have passed their expiration date.
In other words, you should check every essential oil before using it!
How long should I leave the essential oil to rest?
Many essential oils have a brewing period.
Essential oils made with an oil maceration can be used after 8 hours. If you want a stronger essential oil, you should leave it to rest at room temperature for 2 to 4 weeks.
Cooking extracts should be left to rest for 8 weeks minimum. But you can leave them in your cupboard for up to 6 to 12 months.
The overall rule of brewing essential oils is being patient. The longer you leave it alone, the stronger it will get!


