
Scientific Method Example [with Handy Infographic!]
The scientific method is an important skill for all kids to learn as it’s used by everyone, not just scientists. While scientists follow the scientific method in the lab, we use it in everyday life when we have a problem to solve. Kids who learn the scientific method are developing good problem-solving skills.
Kids are capable of learning the scientific method from a very young age. The best way to teach them the steps is through specific examples. You can perform some fun home science experiments to illustrate the steps with your child.
Related post: 5 Magical Harry Potter Science Experiments (That Kids Will Love!)
What Is the Scientific Method?
At its most basic level, the scientific method is a series of steps scientists use to learn more about something unknown or to solve a problem. These steps allow for discoveries and progress.
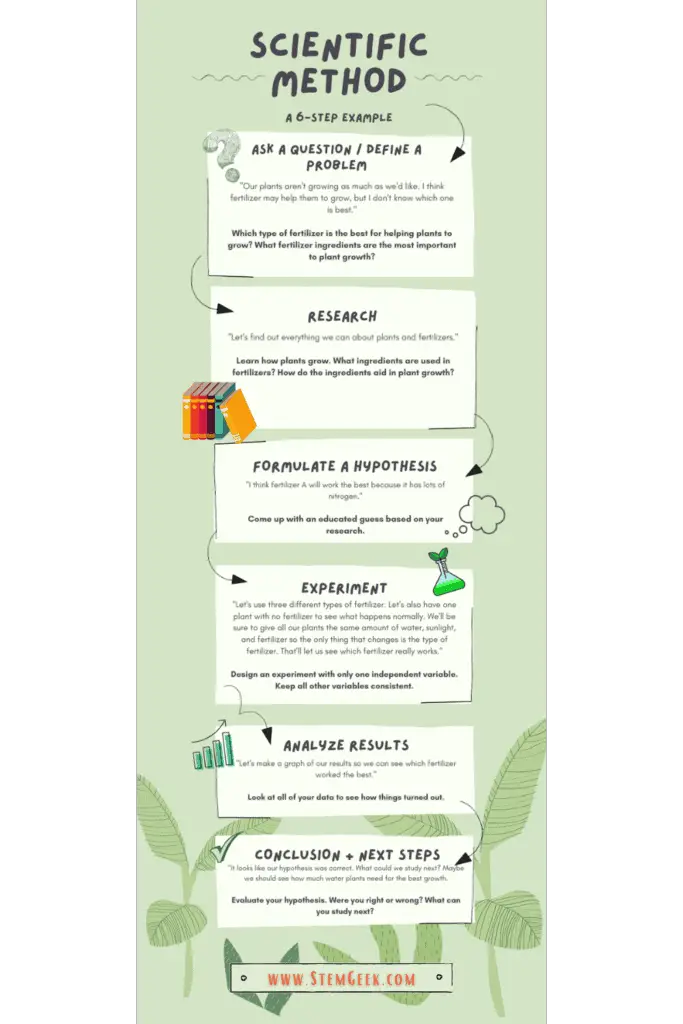
Want to cut to the chase? Here’s a helpful scientific method infographic for easier reference!
Thinking more broadly, everyone uses the scientific method in everyday life, even if they’re not explicitly going through the steps. Anytime you encounter a problem, such as a car or a computer not working, and then troubleshoot to figure out what is wrong and how to fix it, you’re using the scientific method.
Children naturally use the scientific method beginning during the toddler years. Small children constantly form hypotheses, experiment, and form new hypotheses according to their results. For example, a toddler may push a block off the table. They want to see if it will fall. Once they see it fall, they may try their experiment again with the same block or with different objects to see if the results differ.
The Steps of the Scientific Method (with Examples)
There are many different iterations of the scientific method. You’ll see as few as three steps or as many as ten. The process is typically the same, but different versions of the scientific method will group the steps differently. For this article, we’ll stick with six steps as it’s the one you’ll see most frequently.
For each step, we’ll explain the process and then give you two examples to help you (and your child) understand how the method works.
1. Observe a Problem or Ask a Question
The first step of the scientific method involves either observing a problem or asking a question. You may notice an issue and want to know what causes it or if there’s a potential solution. Or, you may have a question that can be answered through science. A problem or question usually leads you to the topic of your experiment.
Example
You may wonder if fertilizers affect the growth of plants. You may wonder whether fertilizers are beneficial to plant growth in comparison to plant growth with no fertilizers. If fertilizers do have an effect, you may then wonder which type of fertilizer is the most effective.
As another example, you may have a problem with your cell phone. Even though you plug it in to charge, it doesn’t charge. This is an issue you can use the scientific method to solve.
These questions will form the basis of the rest of your experiment. The goal now is to find an answer to your question or a solution to your problem.
2. Research

Once you have your question or problem, it’s time to research your topic. It’s important to learn as much as you can before moving on to the next steps. Good research will help you immensely in steps three and four where you’ll need to make a hypothesis and design an experiment.
Good research involves looking for quality sources.
Most books and journals are typically trustworthy, but if you’re searching online, you’ll need to check your source. Stick to websites that are well-known and respected in the scientific community. Use a source like Google Scholar or your local library’s online database to find articles from scientific journals.
Example
For the fertilizer experiment, you should spend some time learning how plants grow and what affects their growth. You should then look into how fertilizers work and what role the major ingredients play in enhancing plant growth.
If you’re trying to figure out why your cell phone won’t charge, you may want to learn how electricity and phone chargers work. You can also research people who’ve had a similar problem and see what they did to solve it.
3. Formulate a Hypothesis
Now that you have a topic for your experiment, it’s time to formulate a hypothesis.
A hypothesis is an educated guess based on your question or problem.
You make a guess about what may or may not happen during the experiment.
Your hypothesis must be specific and testable. If a hypothesis can’t be tested, it serves no purpose. A hypothesis is also a way to organize the variables, or factors that change, in your experiment. You want a hypothesis to address only one idea or aspect of the topic. Too many factors in a hypothesis make it difficult to test.
Examples
Following on with the above question about plant fertilizers, you may come up with a hypothesis that states that plants grow better with fertilizers or that fertilizers containing a higher concentration of nitrogen are more effective. Each of these hypotheses is easy to test.
For the problem with your cell phone not charging, you may hypothesize that the charging cable is defective. You can easily design an experiment to see if your hypothesis is correct.
4. Experiment
Before you test the hypothesis, you’ll need to design an experiment. Create a plan for how you plan to test the hypothesis. Your experiment needs to be something that you (and other scientists) can replicate.
When designing your experiment, there are a few terms you’ll need to know to make sure your experiment is scientifically sound:
The independent variable is the part of the experiment that you’re changing. Other elements of the experiment don’t affect the independent variable. In the fertilizer experiment, the independent variable would be the type of fertilizer used. In the case of your cell phone, the independent variable would be the different ways you troubleshoot your charger, i.e. using a different charger, outlet, etc.
The dependent variable is what you measure as a result of the independent variable. It’s the result that’s being studied in the experiment. For the fertilizer, the dependent variable would be the plant height after the fertilizers are used. With the phone charger, it would be whether or not your phone starts to charge.

Constant variables are the things you don’t change during an experiment. It’s important to only test one independent variable at a time, while all of the other variables remain constant. For example, when experimenting with fertilizer, the only variable that will change is the type of fertilizer used. The type of soil and plants and amounts of water and sunlight should all remain the same. Keeping these elements constant will allow you to truly measure the independent variable.
In some experiments, you may also include a control group. You don’t do anything to a control group and it can often give you a baseline for your measurements. In the fertilizer example, you’ll want at least one plant where all the constant variables remain the same but don’t receive any fertilizer.
After figuring out your experiment design, it’s time to perform the experiment.
Experiments can take anywhere from a few minutes to several years!
It’s important to be diligent in performing the experiment correctly and recording your results regularly.
Example
As an example, while performing the fertilizer experiment, you should regularly measure your plants and record their growth. Make sure to measure at the same time each day and keep a detailed log of everything you notice. You may also take photos to document the results.
With the cell phone charger, you’ll want to stay consistent, changing one variable at a time. You may first try the charger in a different outlet, then with another phone, etc. You will also want to try your phone with a different charger to see if it’s a problem with your phone.
5. Analyze Results
Once you’ve conducted the experiment and gathered the data, it’s time to analyze the results. The results will serve as a guide for deciding if your hypothesis was correct or incorrect and can drive you toward future experiments. It’s important to analyze carefully so you don’t make an error.
One of the hardest elements of data analysis is organizing your data in a way that makes sense and gives you a good perspective on what happened during the experiment. You may want to put the data into a chart or graph. This type of organization will allow you to see patterns and trends in the data and will help you in drawing your conclusions.
Example
With the fertilizer experiment, you’ll need a strategic method for organizing your results. You may want to create a line graph charting each plant’s growth during the experiment. A graph will let you see which fertilizer had the steadiest growth.
For the cell phone charger problem, the results are much more straightforward. With each step of the experiment, your phone either started charging or it didn’t.
6. Conclusion and Next Steps
The final step of the scientific method is the conclusion.
The conclusion is a statement of the results of the experiment and an evaluation of your hypothesis.
If your hypothesis was correct, you should explain how the data proved your right. If your hypothesis was wrong, explain what the data showed and why it went differently than you thought. You may want to form a new hypothesis.
Your experiment isn’t over with the conclusion, though! Good scientists are always figuring out ways to continue their experimentation to learn more about the topic. You may want to repeat the experiment several times to make sure the results are consistent. You may also identify new areas for research or create a new experiment where you test another variable!
Simplifying the Scientific Method for Younger Kids

While most kids between the ages of seven and nine are ready to use the six-step scientific method, younger kids may need something a little simpler. Kids naturally use the scientific method, but it’s never too early to start giving them the scientific language to describe what they’re doing.
With small children, you may want to use the three-step scientific method. This method still covers all of the steps of the scientific method but in a simplified form.
A Three-Step Scientific Method for Younger Children
Focus on teaching your child to:
- Ask a question
- Make a hypothesis
- Experiment to see if they’re right
Don’t shy away from using big words with kids. You can use the word hypothesis, and explain that it means “what you think will happen.”
As a scientific method example with younger kids, you may perform a simple experiment such as how to prevent apples from turning brown after slicing. Let your child experiment with different liquids, such as lemon juice, orange juice, milk, and anything else you have on hand. You can also let your child make suggestions of what to try, such as putting the apple in the refrigerator or wrapping it in foil.
Ask your child which one of the substances they think will work best and why they think so. Then perform the experiment, modeling for your child how to keep variables constant, such as using the same type of apples. Observe the apples after a given time and help your child evaluate their hypothesis.
Frequently Asked Questions
What is the scientific method in everyday life?
We use a less formal process of the scientific method in everyday life. While most of us don’t explicitly go through the steps, when we encounter a question or problem, we usually do research, make a hypothesis, experiment, analyze the results, and evaluate our hypothesis.
Can kids use the scientific method?
Absolutely! Kids naturally use the scientific method all the time. They’re little scientists and they love to learn new things. Be sure to do plenty of science experiments with your child and explain the steps of the scientific method as you go.
Why are there so many versions of the scientific method?
While Sir Francis Bacon is usually credited with defining the scientific method, but many elements of the method go back to the ancient Greeks and Muslims. As with many inventions and discoveries, there’s no specific beginning. Instead, ideas have been built upon over centuries.
While there are many versions, as you inspect them further, you’ll see that the basics are the same and the steps are just grouped differently. You can teach your child any version that works for you.


